What is “Wasai”
Before you learn about unshin, you have to know what wasai is.
“Wasai” is the process of making kimonos with your own hands.
Various techniques are used to make a kimono.
The basic sewing method used in kimonos is unshin.
The meaning is to carry the needle in kanji.
Actually, we use not only unshin for making kimono but also other techniques.
But this time, I’ll show you Unshin.
More than 80% of unshin is used to make a kimono.
Let’s get to know the 運針-Unshin
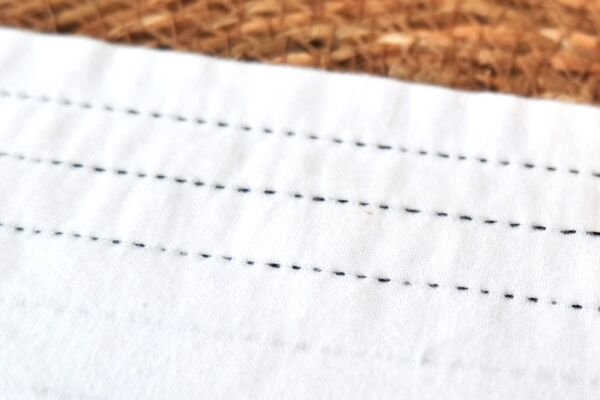
Unshin is the basic sewing method used most often in kimonos.
It looks the same as normal stitching, but its sewing method is very unique.
Became a professional, I can finish sewing 1m in about 3 minutes.
The technitioans are called “和裁士-wasaishi.”
However, currently, the number of people who inherit the skills is decreasing, and the examinations are highly difficult, so those who pass through the exams are quite few.
But those who have obtained qualification have earned a high reputation in the industry and are nationally recognized qualified persons who have passed an examination that certifies a higher level of knowledge and skills for tailoring Japanese clothes.
According to the Vocational Ability Development Promotion Law, those who do not have the qualifications of a washaishi are prohibited from claiming themselves as kimono tailors.
What do we use tools?

We use these tools for the practice of unshin.
- Fabric for practice
- Thread
- Needle(I’m using a needle for kimono, it’s called “四の二-shinoni”)
- Kakehari
- Kukedai
- Thimble
Please use the no-elasticity fabric for practice.
Any thread is fine, but I use cotton thread.
Thimble

The thimble prevents pain caused by needles, and it is made from cowhide.
I put the thimble on dominant hand and sew.

You can use any material for your thimble, but put the thimble between the first and second joints on your middle finger.
Needle

“四の二-Shi-no-ni” is often the needle used for making kimono.
These are numbers. The number indicates the thickness and length of the needle.
四(shi) = 4, if the number is increasing, the needle will be thicker.
二(ni) = 2, if the number is increasing, the needle will be longer.
There are fine vertical lines on the surface of the polished needle.
Thanks to it, it passes through the cloth well and does not make you feel tired.
You can use any needle for “Unshin” as long as it is suitable for hand sewing.
Kekehari & Kukedi

These are tools that make hand sewing easier.
I clip the fabric onto and then pull for sewing.
It’s good to have but it’s okay if you don’t have it for practice.
How to hold a needle

When you hold the needle, please put your thimble between the first and second joints on your middle finger.
First, touch the needle to the center position on your thimble.
Always the needle must touch the center position on your thimble.

And than you can hold the needle between the index finger and thumb.

When you are a beginner, you are not used to holding the needle.
Please don’t lean like this. Always keep your needle straight.
Practice to move fingers

Stick the needle into the table. The table will get scratched, so make sure it’s something you don’t mind getting scratched.
I’m using the board of make a kimono, it call it “へら台-Heradai”

①Stick the needle on the table, and next, the head of the needle touches the center position of your thimble.

②Grab the needle with your index finger and thumb.


③Let’s move your fingers.
Please move your index finger and thumb like this and touch the needle alternately.
This movement is important for Unshin.
This movement will be the dominant hand’s.
Practice to swing the fabric
Practice the movement of your non-dominant hand.
I’m right-handed, so let’s try how to move the left hand.
If you left-handed, please hold the fabric with your right hand.

Tighten the fabric like this and hold it.
Move your left hand up and down without moving your dominant hand.

Please move straight up and down 90 degrees.


Don’t move the fabric too far forward or too far back like this.
If you are doing like this, you are not able to sew nicely.
Try the Unshin

First, make a stitch, and the needle is touching the thimble make sure that is center position.

Your index finger go to behind the fabric.

Place your thumb on the needle.
Now, You hold the needle and fabric between your index finger and thumb.

Hold the fabric with your non-dominant hand, about one palm away from the dominant hand.

When you bring up the fabric, a tip of needle could be up as well. Hold the needle with your thumb to prevent it.
Make sure the tip of the needle does not point upwards.
Keep your thumb at the same position to privent a needle from going up.

The needle position is always kept parallel.

Push the needle with your thimble at a 90 degree angle through the fabric. Now the needle appeared behind the fabric.

When you bring down the fabric, a tip of needle could be down as well.
Hold the needle with your index finger to privent it .
Make sure the tip of the needle does not point downwards.
Keep your index finger at the same position to privent a needle from going down.

And push the needle your thimble. These movement are repeating.
Always keep the needle parallel.
At first it is difficult to stabilize the needle on the middle finger.
I think a lot of times the needle will fall down of the thimble.
Please practice stabilizing the needle and thimble.
You are able to stabilize the needle and thimble a few times practice.
I think it’s hard to keep the needle parallel.
If you are not able to do what I’m teaching you, it’s okay to move the dominant hand a little.
However, with my method, the tip of the needle doesn’t move, so you can sew straight.
I fix my dominant hand when I do the Unshin.
But the method of Unshin differs depend on who teaches it.
If you didn’t get it, let’s try another way

Another sewing method move the dominant hand up and down very well.
When you are bringing down the fablic, your dominant hand is going up.
At this time, the index finger is supporting the needle upward.

Move the thumb and at this morment, now you’re holding the fablic and needle.And push the needle by your thimble.

When the fablic is bringing up and your dominant hand is going down.
Now your thumb is supporting the needle downward.

Move the index finger and hold the fabric and needle.
And push the needle by your thimble. Please repeat these actions.
You can choose which method is the best for you.
Please try both of them and choose the best one☺
Ideal seams

Ideally, there should be 9 seams in 4 cm.
It is a very beautiful seam if each stitch is the same size and parallel to the side.
Bad seams…
I’ll show what bad seams are.
ハ縫い-Hanui

Hanui is the upper seam in picture. it looks zigzag seams.
It doesn’t look good.
Wasai intentionally puts looseness in the seams, which reduces damage to the fabric and also creates beauty when finished.
In this condition, it is difficult to put looseness in the seam.
飛び目-Tobime

Tobime is a stitch that appears to skip to the next stitch.
Unshin is always sewn two pieces of fabric together, a tobime is sewn on only one piece of fabric.
This often happens because the seam is not visible on the reverse side of the cloth.
This is caused by not moving the cloth up and down firmly enough and not moving the fingers enough.
How to use Kakehari & Kukedai
Kakehari & Kukedai are tools for hand sewing easier.
It is good to have them, but It is not compulsory.
This time, I’ll show you how to use them.
Kukedai adjust with your table

Pleease prepare your Kukedai, and adjust with your table or desk.
Thread the kakehari string through the circle of the kakedai.
Use the kakehari

When you use a kakehari, pinch the edge of fabric and pull it well.
Don’t make a loosen.
Kakebari pulls the fabric, making it easier to move the needle.
We can push the needle with less power.
If you want to sew very fast, you need kakehari and kukedai.
When you used to the Unshin, Let’s try use them!

